Anhydrous Calcium Chloride Concrete Moisture Vapor Emission & pH

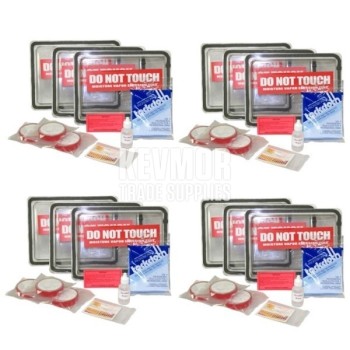
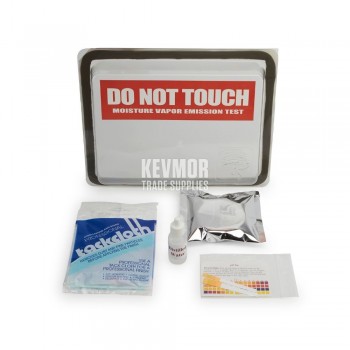
This calcium chloride moisture test kits are used to obtain a quantitative value that indicates the rate of moisture vapour emission from a concrete slab to determine if the slab is acceptable to receive the finished floor covering. Also, included are pH test papers and distilled water used to measure the surface alkalinity of the concrete slab to determine if it meets the recommendations of the flooring or adhesive manufacturer. Inexpensive and easy to use, these kits are widely recommended by floor covering product manufacturers and conform to the American Society for Testing and Materials (ASTM International) Standard ASTM F 1869-04 for testing of moisture. Detailed instructions, results sheet and a tack cloth used to remove dust prior to installing the clear dome dish cover are included with each kit.
Note: Please refer to Australian Standards for m2 requirements
Test Kit Guide - Anhydrous Calcium Chloride Concrete Moisture Vapor Emission & PH
Test 1: Moisture Vapor Emission
This test produces the quantitative value that indicates the rate of moisture vapour emission from below-grade, on-grade and above-grade (suspended) bare concrete floors. This test is not suitable to evaluate moisture vapour emitted by lightweight concrete floors containing lightweight aggregate. This test should not be used to evaluate moisture vapour emissions over coatings, patching or levelling compounds or gypsum concrete.
Test 2: Surface pH
Produces the surface pH of the concrete slab to determine if it meets the recommendations of the flooring and/or adhesive manufacturer. The enclosed full-range strips measure 0-14 pH range in a single test with a 0.5 pH sensitivity.
Test 1: Moisture Vapor Emission
All floor coverings are susceptible to failure from excessive moisture vapour emissions. The calcium chloride moisture test kit is the industry standard for measuring the quantitative rate of moisture vapour emissions from below-grade, on-grade or above-grade (suspended) bare concrete slabs. Accurate test results can only be achieved when the test is conducted in a properly acclimatized environment. The test site climate should be at its normal service temperature and humidity for at least 48 hours prior to and during testing.
The test conditions should be: 75 ± 10° F (23.9 ± 5.5° C) and 50 ± 10% relative humidity.
The proper number of test kits for the area to be tested: Three (3) kits for the first 1000 square feet, then one (1) kit for each additional 1000 square feet or fraction thereof.
Preparing the Test Site
Proper preparation of the concrete surface is imperative to ensure accurate test results. The test area must be clean and free of all foreign substances. All residual adhesives, curing compounds, sealers, paints, patching compounds and floor coverings, etc. must be removed. If there is an existing floor covering installed, a minimum area of 20” x 20” should be exposed for a minimum of 24 hours prior to starting the test.
1. Perform tests on flat, unbroken concrete surfaces, away from direct sunlight and heat registers.
2. Shot blast or grind (A) the test area to properly clean and prepare the floor surface.
3. Sweep and vacuum the test area thoroughly to remove all dust and debris. Use a tack cloth (B) to remove any dust. Do not use any sort of chemical cleaner to remove old adhesive or paints.
4. Prepare three (3) sites for the first 1000 square feet and one for each additional 1000 square feet or fraction thereof.
Starting the Test:
1. Read the complete test procedure carefully. The test must be conducted correctly to obtain valid results. Read all warning labels.
2. Remove the petri dish containing the anhydrous calcium chloride crystals from its sealed package. Using a gram scale, weigh the petri dish (C) including its tape and lid. Record the start weight to the nearest 0.1 gram on the lid label (D). Also, record the starting date and time to the nearest ± ¼ hour. Allow enough time to expose the test to a minimum of 60 hours and a maximum of 72 hours, according to ASTM F-1869-04 Standard.
Placing the Test Specimen:
3. Remove the vinyl tape from the petri dish (E). Stick the vinyl tape on the inside of the dome (F), as you will need it to reseal the dish at the end of the test.
4. Invert the petri dish lid and place the petri dish into the inverted lid (G). Do not spill any of the calcium chloride, as this will completely invalidate the test.
5. Carefully level the calcium chloride in the petri dish and place it on the test area. Remove the white release paper from the gasket on the perimeter of the dome (H). Place the dome over the petri dish (I). Seal the dome lid by using the blunt end of a screwdriver or awl, totally sealing the test specimen from all external factors (J). Be sure you have recorded the exact date and time. Gently apply pressure to the dome lid. Correct any sign of leakage with more pressure to the perimeter tape sealant.
6. Let the test sample remain undisturbed for 60-72 hours. Carefully allot your time to give the correct time of floor surface exposure. Tests not given the specified time will be invalid.
7. After 60-72 hours, cut open the dome and carefully remove the petri dish and lid (K). Replace the lid, and reseal with the saved tape. Record the date and time of removal.
8. Using the gram scale, weigh the dish and record the ending weight on the lid label. Follow instructions to calculate the moisture vapour emission rate.
Moisture vapour emission results
Calculation formula: Test weight gain x 121.045 ÷ Test hours exposed = pounds per 1,000 square feet per 24 hour period
Test 2: Surface pH
1. Pour a small quantity of distilled water (approximately 1.0” in diameter) onto the clean concrete surface to form a puddle (L).
2. Allow the water to sit undisturbed, for approximately one minute, then place a pH strip into the distilled water. Allow 10 seconds for the pH strip to change colour.
3. Determine the pH of the concrete surface by matching the colour of the paper strip to its corresponding colour on the supplied chart (M).
4. A pH reading in excess of 9 has been known to affect carpet, resilient, wood flooring and/or water-based adhesives. Refer to flooring manufacturer for guidelines on acceptable pH levels.
Anhydrous Calcium Chloride Concrete Moisture Vapor Emission & pH